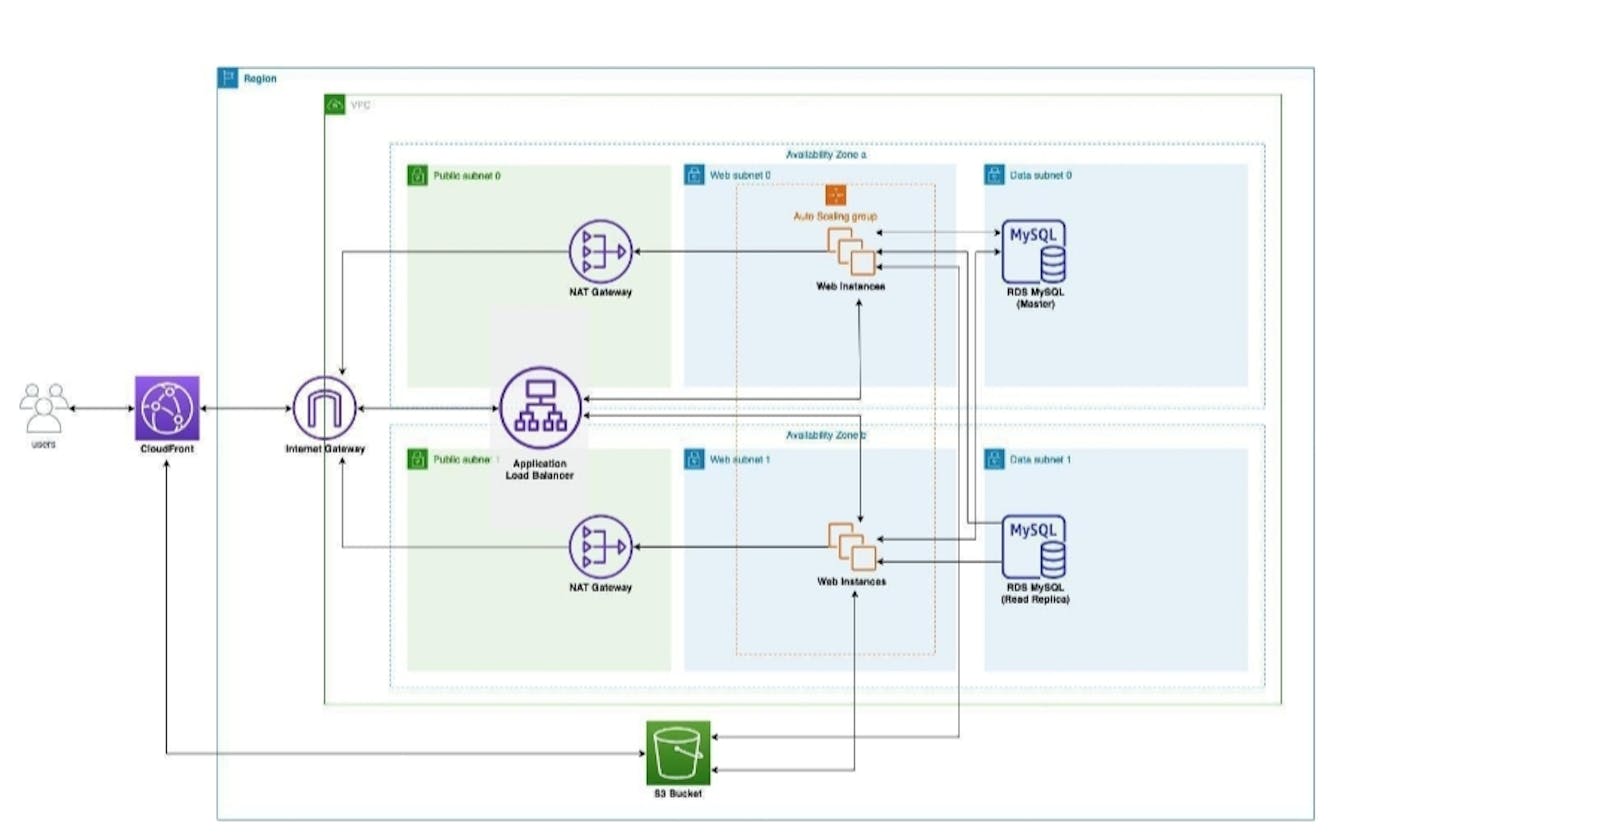


In this final project, we will create a highly available (HA), scalable and fault-tolerant deployment of the WordPress application. You will deploy the WordPress application in such a way that the application server, load balancer and database will scale independently of one another. You will also deploy the application's components like the web server and database into two availability zones to distribute it and guard against failure of the anyone availability zone. The WordPress application will be deployed in a stateless fashion so that we can add or remove web application servers in response to the requests flowing into the system. Finally, we create a CloudFront distribution as CDN and change the configuration of WordPress.
Project Details
Step 1: Create WordPress AMI (Amazon Machine Image)
1 . Visit the EC2 instance page, and select the public WordPress instance created in the last assignment. In case you deleted it, you need to follow all steps to create an EC2 instance with a WordPress assignment. That we are going to use to create Amazon Machine Image.
Click Actions → Image and templates → Create image
Enter the Image name and click Create image
Step 2: Create an Application Load Balancer
Make sure you are in the right region to complete this project and stick with the same region all the time till the end of this project.
Visit EC2/Load Balancing/Load Balancers
Click Create Load Balancer
In Step 1: Select load balancer type, find Application Load Balancer and click Create
In the Basic Configuration section, enter the name WordPress-alb
In Availability Zones, for VPC, choose Vpc created in the last assignment or create a new one.
For Availability Zones, select PublicSubnet0 and PublicSubnet1
In Step 2: Configure Security Settings, click Next
In Step 3: Configure Security Groups, for Assign a security group, choose Create a new security group
For the Security group name, enter alb-sg and click Next Configure Routing
Step 4: Configure Routing
For Target Group, select New target group
For Name, enter wordpress-tg
For Target type, select Instance and click Next: Register Targets
In the Register Targets stage, click Next: Review
In the Review stage, click Create
Step 3: Create Auto Scaling Group
Visit EC2/Network & Security/Security Groups Click Create Security group
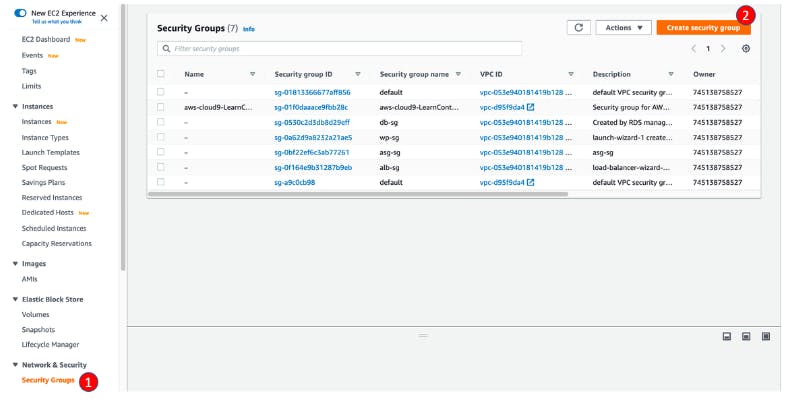
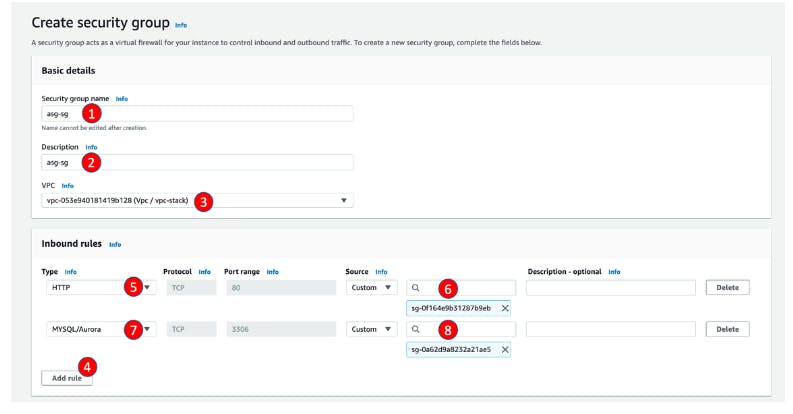
For Security group name, enter asg-sg
For Description, enter asg-sg
In Inbound rules section
Click Add rule
For Type, select HTTP
For Source, select Custom and find alb-sg
Click Add rule again
For Type, select MYSQL/AURORA
For Source, select Custom and find db-sg
Click Create a security group
Visit EC2/Network & Security/Security Groups
Find db-sg and click its Security group ID
Click Edit inbound rules
Click Add rule
For Type, select MYSQL/AURORA
For Source, select Custom and find asg-sg
Click Save Rules
Visit EC2/Auto Scaling/Launch Configurations
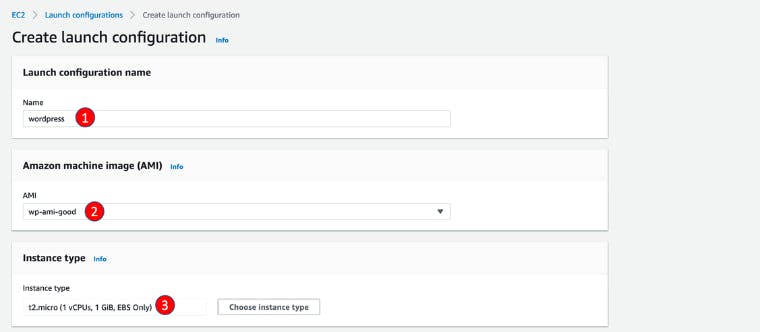
Click Create Launch configuration
For name, enter wordpress
For AMI, choose AMI created in last step
For Instance type, search and select t2.micro
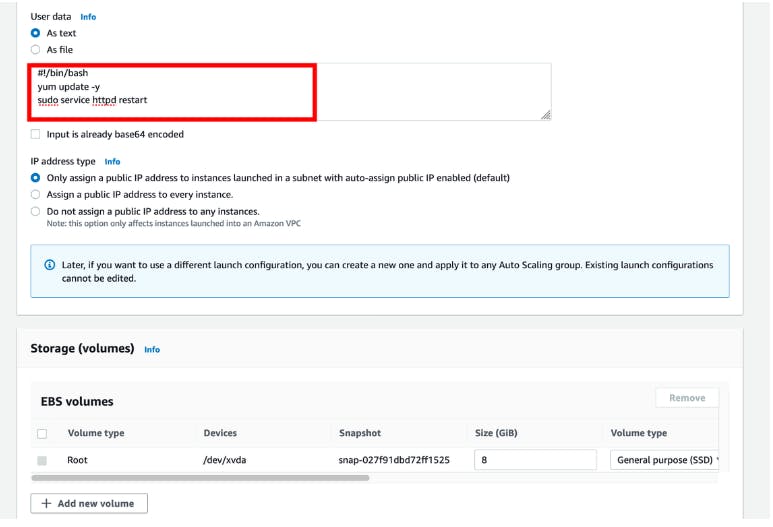
In the Additional configuration section, click Advanced details
For User data, select As text and enter the script below
```bash
#!/bin/bash yum update -y sudo service httpd restart ```
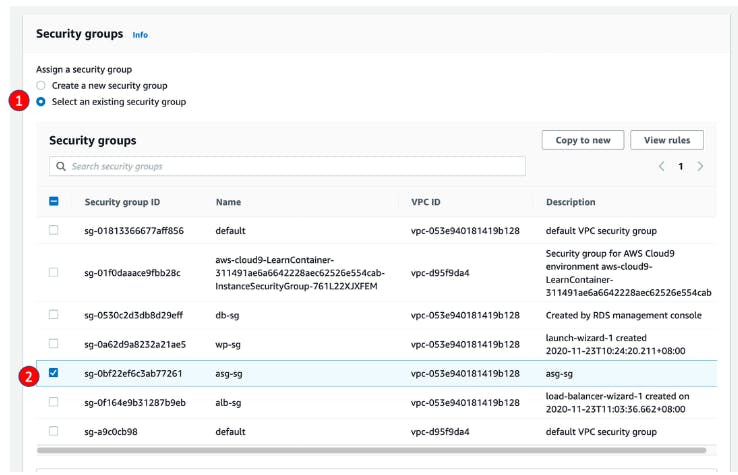
For Security group, select Select an existing security group and select as-sg just created
For Key pair options, select Choose an existing key pair
For the Existing key pair, select the key created in Lab 1
Finally, click Create launch configuration
For Security group,select Select an existing security group and select asg-sg just created
For Key pair options, select Choose an existing key pair
For Existing key pair, select the key created in Lab 1
Finally, click Create launch configuration
Visit EC2/Auto Scaling/Auto Scaling Groups
Click Create an Auto Scaling Group
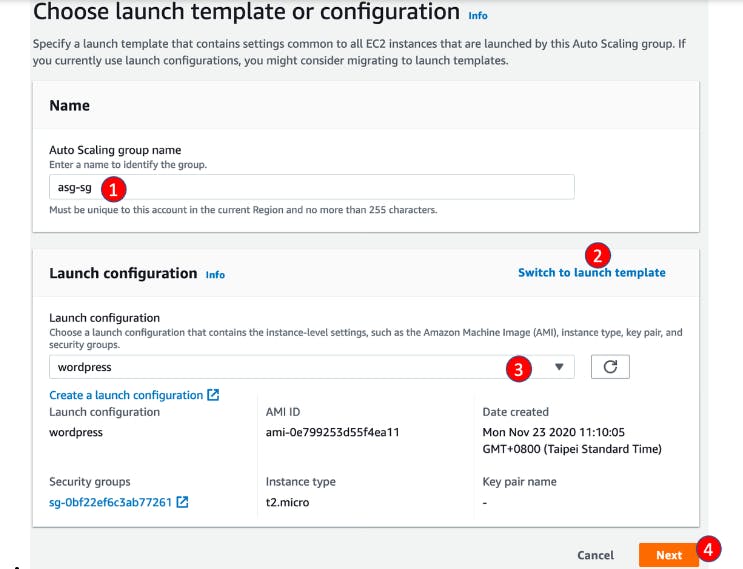
For Auto Scaling group name, enterwordpress-sg
For Launch template section, click Switch to launch configuration and select the launch configuration created in last step and click Next
In Configure setting stage,
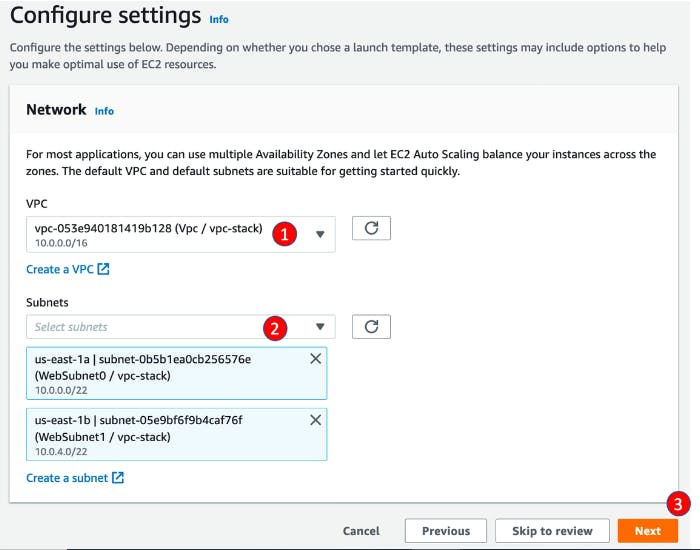
For Vpc, select Vpc / vpc-stack, created by CloudFormation
For Subnets, select WebSubnet0 / vpc-stack and WebSubnet1 / vpc-stack, then click Next
In Configure advanced options stage
For Load balancing, select Attach to an existing load balancer
For Existing load balancer target groups, select alb-tg
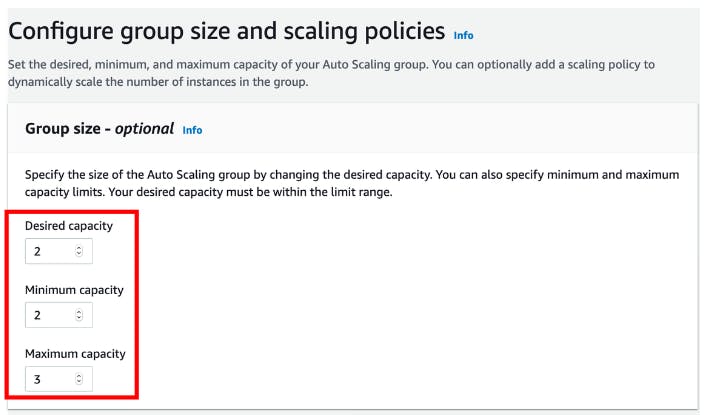
In Configure group size and scaling policies stage
In Group size - optional Section
For Desired capacity, Minimum capacity, Maximum capacity, enter 2,2,3 then click Next
In Add notifications and Add tags sections, click Next


In Review sections, click Create Auto Scaling group
Step 4: Create CloudFront Distribution
Create distribution manually
Visit CloudFront console, and click Create distributions, choose Web for delivery method

In Default Cache Behavior Settings
For Origin Protocol Policy, select Redirect HTTP to HTTPS
For Allowed HTTP Methods, select GET, HEAD, OPTIONS, PUT, POST, PATCH, DELETE
For Cached HTTP Methods, select GET, HEAD, OPTIONS
For Cache and origin request settings, select Use legacy cache settings
For Cache Based on Selected Request Headers, select Whitelist
For Whitelist Headers, search and add Host and Origin

For Object Caching, select Customize
For Minimum TTL, enter 0
For Maximum TTL, enter 31536000
For Default TTL, enter 300
For Forward Cookies, select **comment_author_*, comment_author_email_*, comment_author_url_*, wordpress_*, wordpress_logged_in, wordpress_test_cookie, wp-setting-**
For Query String Forwarding and Caching, select Forward all, cache based on all
For Smooth Streaming, select No
For Restrict Viewer Access, select No
For Compress Objects Automatically, select Yes
Finally, Create Distribution

Visit CloudFront Distribution page
Click the distribution ID created in last step
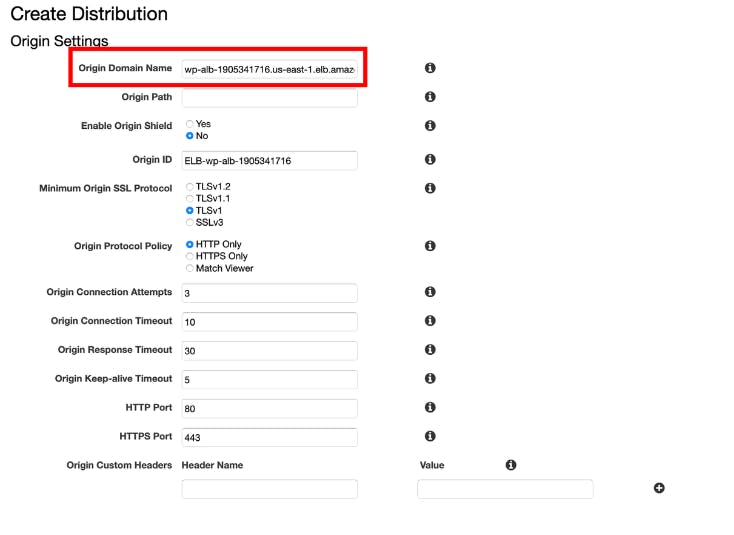
Click Origins and Origin Groups tab, and click Create Origin
For Origin Domain Name, select S3 bucket created in Lab 1 and Click Create

- Next, move to Behavior in your Distribution and click Create Behavior, follow the table below to create 4 new behaviors:

Test & access your blog with Cloudfront DNS.
Visit RDS console
Click Databases in left menu,
Click Actions -> Create read replica
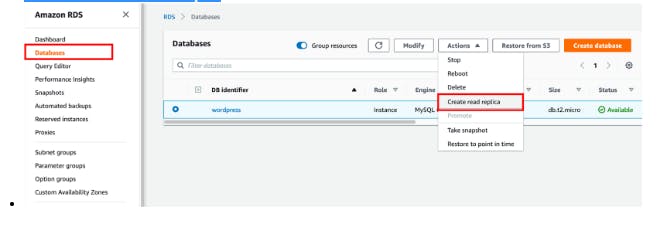
Enter the wp-read-replica for DB instance identifier
Click Create
Go back to databases page, you will see the read replica instance now. After minutes, it will be created successfully.

REFERENCE
Attachment
example-wp-config.php (2 kb)
putty_setup.pdf (957 kb)